Wednesday, May 28, 2014

Login with Twitter

Twitter is a large social network and they provide Oauth Support.Signin with twitter Oauth is used to avoid form filling for registration and easily signin using twitter account.


This tutorial contains the following files.

1.index.php
2.config.php
3.process.php

and library files provided by twitter.


Config.php

 <?php
        define('CONSUMER_KEY', 'XXXXXXXX'); //Replace With your key
        define('CONSUMER_SECRET', 'XXXXXXXX');//Replace With your CONSUMER SECRET
        define('OAUTH_CALLBACK', 'XXXXXXXX');//Replace With your Callback url
    ?>

Login Button

 <?php
          echo '<a href="process.php"><img src="images/sign-in-with-twitter-l.png" width="151" height="24" border="0" /></a>';
      ?>

Welcome Message for User

<?php
    $Username         =     $_SESSION['request_vars']['screen_name'];//Twitter username
    $twitterid             = $_SESSION['request_vars']['user_id']; //Twitter Account Id
    $oauth_token         = $_SESSION['request_vars']['oauth_token']; //Twiiter Oauth token
    $oauth_token_secret = $_SESSION['request_vars']['oauth_token_secret']; //Twitter Secret
  

    //Show welcome message
    echo '<div class="welcome_txt">Welcome <strong>'.$Username.'</strong> <a href="index.php?reset=1" style="float:right">Logout</a>!</div>';
    $connection = new TwitterOAuth(CONSUMER_KEY, CONSUMER_SECRET, $oauth_token, $oauth_token_secret); ?>

Please share your comments and feebback.Thanks.Please subscribe my updates via email.

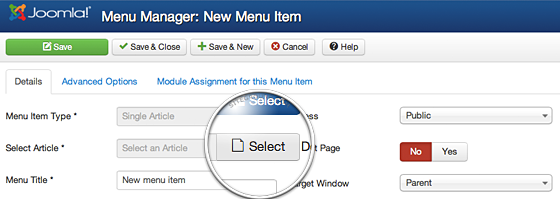
How to link to an Article in a Joomla 3 Menu

Joomla is popular CMS tools.It is used to develop various type of websites.

Adding article is very in Joomla and develop web applications in joomla is very very easy.There is many types of menu types available in joomla.In this i have used Single article menu type to link article.


Find the below steps to add new article.

Step 1: Login to your Joomla admin section using your admin username and password.


Step 2: Add menu name using Menu manager.Enter Menu and alias.


Step 3: Select Menu type.


Step 4:Select Single article from the menu type.


Step 5: Select your article.Click select article button.


Step 6: Finally click Save button.

Directory (or) Folder Creation in PHP

mkdir function is used to create folder or directory in php.

Syntax:
mkdir($str, 0777, true)

PHP Code

<?php
        if(isset($_POST['createdirectory']))
        {
                $folder='D:\phptest\\'; // Desired folder path
                $foldername=$_POST['foldername'];
                $foldercreate=$folder . $foldername;
            if (!mkdir($foldercreate, 0777, true))
                {
                    die('Failed to create folder...');
                }
            else
                {
                    echo "Folder has been created successfully!";
                }
                    $foldercreate="";
                }
        ?>

HTML Form

 <form action="#" method="post">
      Enter Name of the folder:
      <input type="text" name="foldername" size="15" required />
      <input type="submit" name="createdirectory" value="Create" />
  </form>

Complete Code

 <form action="#" method="post">
  <h3>Directory (or) Folder Creation in PHP:</h3>
  Enter Name of the folder:
  <input type="text" name="foldername" size="15" required />
  <input type="submit" name="createdirectory" value="Create" />
  <?php
if(isset($_POST['createdirectory']))
{
        $folder='D:\phptest\\'; // Desired folder path
        $foldername=$_POST['foldername'];
        $foldercreate=$folder . $foldername;
     if (!mkdir($foldercreate, 0777, true))
        {
            die('Failed to create folder...');
        }
    else
        {
            echo "Folder has been created successfully!";
        }
            $foldercreate="";
        }
?>
  </div>
</form>

Please share your comments and feebback.Thanks.Please subscribe my updates via email.

Tuesday, May 27, 2014

How to write a new Article in Joomla 3

Joomla is CMS(Content Management System),it allows you to magae content very easily.It is very easy to add article in joomla.


Find the below steps to add new article.

Step 1: Login to your Joomla admin section using your admin username and password.
Step 2: There are two options available to add new article.
    1.In the top menu, under Content, hover over Article Manager and then click Add New Article.
2.In the Quick Links click Add New Article.
Step 3:Enter your article title and alias.
Step 4: Select your article category.
Step 5: Enter your content in editor.
Step 6: Finally click Save button to publish your article.
Note:There are many options and settings you can change.This is very basic steps how to add new article.

Please share your comments and feedback.Thanks.Please subscribe my updates via email.


Monday, May 26, 2014

Caps Lock Alert jQuery plugin

The CapsLockAlert() function is used to detect caps lock.


CapsLock detector is very useful function.Before that We need jQuery library file to perform this action.So include the following library files.
1.jquery.min.js
2.jquery.tipsy.js


There is a plugin called jquery.jccapsalert.js ,used to detect state of capslock.

JQuery Library Files

<script type="text/javascript" src="https://ajax.googleapis.com/ajax/libs/jquery/1.7.2/jquery.min.js"></script>
    <script type="text/javascript" src="js/jquery.tipsy.js"></script>
    <script type="text/javascript" src="js/jquery.jccapsalert.js"></script>

JQuery Functions

<script type="text/javascript">
            jQuery("#pass").CapsLockAlert();
      </script>

The CapsLockAlert() function is used to detect caps lock.

HTML Form

<form>
      Enter Your Password
      <input type="password" id="pass" value=""/>
    </form>
Please share your comments and feebback.Thanks.Please subscribe my updates via email.

Saturday, May 24, 2014

Generate captcha using Javascript

Hi friends.In this post i am going to show how to create captcha using Javascript.

The captacha code is creating using onload() function.And i have used two math function to create captcha.

1.Math.ceil
    The ceil() method rounds a number UPWARDS to the nearest integer, and returns the result.

2.Math.random
    The random() method returns a random numbers.

Javascript Functions

<script type="text/javascript">

   //Created / Generates the captcha function  
    function DrawCaptcha()
    {
        var a = Math.ceil(Math.random() * 9)+ '';
        var b = Math.ceil(Math.random() * 9)+ '';     
        var c = Math.ceil(Math.random() * 9)+ '';
        var d = Math.ceil(Math.random() * 9)+ '';
        var e = Math.ceil(Math.random() * 9)+ '';
        var f = Math.ceil(Math.random() * 9)+ '';
        var g = Math.ceil(Math.random() * 9)+ '';
        var code = a + ' ' + b + ' ' + ' ' + c + ' ' + d + ' ' + e + ' '+ f + ' ' + g;
           document.getElementById("txtCaptcha").value = code;
        document.getElementById("txtCaptchaDiv").innerHTML = code;
    }

    // Remove the spaces from the entered and generated code
    function removeSpaces(string)
    {
        return string.split(' ').join('');
    }
  

</script>

HTML Form

  <form method="post" action="#" id="form1" name="form1">
      <table cellspacing="0" cellpadding="2" border="0">
        <tbody>
          <tr >
            <td class="style1">Enter This Code <span style="color:#F30">*</span></td>
            <td colspan="2" style="margin-top: 10px;display: block;margin-bottom: 10px;"><span id="txtCaptchaDiv"></span></td>
          </tr>
          <tr>
            <td>&nbsp;</td>
            <td colspan="2"><input type="hidden" id="txtCaptcha" />
            </td>
          </tr>
        </tbody>
      </table>
    </form>
Please share your comments and feebback.Thanks.Please subscribe my updates via email.

Generate Password Using Jquery

Hi friends.In this post i am going to show how to Generate Password Using Jquery using Passy Jquery Plugin.

Passy is a jQuery plugin.It is used to rate the password and generate new passwords.

Features:

1.Check password strength.
2.Checks lowercase, uppercase, numbers, punctiation and foreign characters.
3.Compare passwords with pattern like '!#$*+-.:?@^'.
4.Generate new passwords.

JQuery Functions

<script type="text/javascript">
    var $input = $('#input');
    var $output = $('#output');
    $('#pwd').click(function() {
        $input.passy('generate', 8);
    });
</script>

HTML Form

<form method="post" action="#">
          Enter your password :
          <input type="text" id="input" />
          <a href="javascript:void(0);" id="pwd">generate</a>
        </form>

Please share your comments and feebback.Thanks.Please subscribe my updates via email.

Check Password strength using Passy Jquery Plugin

Hi friends.In this post i am going to show how to Check Password strength using Passy Jquery Plugin.I have used Passy jquery plugin to check password strength.


JQuery Functions

      <script type="text/javascript">
    var $password = $('#password');
    var $strength = $('#strength');

    $.passy.requirements.length.min = 4;

    var feedback = [
        { color: '#FF3300', text: 'Very Weak' },
        { color: '#009933', text: 'Weak' },
        { color: '#00FF99', text: 'Good' },
        { color: '#00FF33', text: 'Very Strong' }
   ];

        $password.passy(function(strength, valid) {
        $strength.text(feedback[strength].text);
        $strength.css('background-color', feedback[strength].color);

    });

 
</script>

HTML Form

<form method="post" action="#">
      Enter your password :
      <input type="password" id="password" placeholder="Enter your password" />
      <span id="strength">...</span>
    </form>

Please share your comments and feebback.Thanks.Please subscribe my updates via email.

Friday, May 23, 2014

Free Responsive HTML5 and CSS3 Site Templates

Free Responsive HTML5 and CSS3 Site Templates


Features

1.Fully Responsive and look great on smartphones, tablets, PCs.
2.Developed on HTML5 and CSS3
3.Easy Customizable
4.100% Free templates

Click here to download free templates

Please share your comments and feedback.Thanks.Please subscribe my updates via email.

Thursday, May 22, 2014

Add the Twitter Follow Button to your Website

Hi friends.In this article am going to show you how to add twitter follow button in your website.Social websites are very important for websites.


Please find the below steps:

Step 1: Click here to get twitter button code.
Step 2: Copy and Paste code under using Javascript

HTML Form

 <a href="https://twitter.com/vinothkumar23" class="twitter-follow-button" data-show-count="true" data-lang="en" >Follow @vinothkumar23</a>
<script>!function(d,s,id){var js,fjs=d.getElementsByTagName(s)[0];if(!d.getElementById(id)){js=d.createElement(s);js.id=id;js.src="http://platform.twitter.com/widgets.js";fjs.parentNode.insertBefore(js,fjs);}}(document,"script","twitter-wjs");</script>
Step 3: Configure follow button.Use the following options.Many options are available in twitter button configuration.
If you want to display followers in buttons.use the following option.
data-show-count = true

If you want to display large button.use the following option.

Two button options are available in twitter follow button.
1.Large
2.Small

For Large button use the following code
data-size = large

Step 4 : Save and Upload.Now you will see twitter follow button in your website.

Free Programming Books

Hi friends.I have found very useful link for programmers.Find the below url for free programming books.

Click here go to free programming books page.

Please share your comments and feedback.Thanks.Please subscribe my updates via email.

Monday, May 19, 2014

Auto Select text in textarea

Auto Select text in textarea


Lets take a look.

HTML Form

    <textarea rows="10" cols="50" onclick="this.focus();this.select()" readonly="readonly">
   Lorem Ipsum is simply dummy text of the printing and typesetting industry. Lorem Ipsum has been the industry's standard dummy text ever since the 1500s, when an unknown printer took a galley of type and scrambled it to make a type specimen book. It has survived not only five centuries, but also the leap into electronic typesetting, remaining essentially unchanged. It was popularised in the 1960s with the release of Letraset sheets containing Lorem Ipsum passages, and more recently with desktop publishing software like Aldus PageMaker including versions of Lorem Ipsum.
</textarea>
Please share your comments and feedback.Thanks.

Limit the Characters in textarea using jquery

In this article i am going to show how to set limit the Characters in textarea.

Lets take a look.


jQuery Function

      <script>
$(document).ready(function() {
    var text_limit = 100;
    $('#counter').html(text_limit + ' characters remaining');

    $('#textarea').keyup(function() {
        var text_len = $('#textarea').val().length;
        var text_remaining = text_limit - text_len;

        $('#counter').html(text_remaining + ' characters remaining');
      
        if(text_remaining == 0) {
            alert("Only 100 characters allowed");
        }
    });
});
</script>

jQuery Function

<form method="post" action="#">
      <textarea id="textarea" rows="8" cols="30" maxlength="100" ></textarea>
      <div id="counter"></div>
    </form>
Please share your comments and feedback.Thanks.

Saturday, May 17, 2014

Check Username availability in PHP using Ajax

In this article i am going to show how to check Check Username availability in PHP using Ajax.

Lets take a look.


PHP Function

    <?php
include("conn.php");

    if(isset($_POST['username'])){
        $user = $_POST['username'];//Get entered username
        $res = mysql_query("SELECT * FROM users WHERE username='$user'");
        $count = mysql_num_rows($res);//Get total num of users list for entered username
        if($count >= 1){
            echo "Not Available";//Show result if not available
        }else{
            echo "Available";//Show result if available
        }
    }
?>

Database Connection

  <?php
$connection=mysql_connect("localhost","root","");
$db=mysql_select_db("database",$connection);

// Check connection
if (!$connection) {
    die('Could not connect: ' . mysql_error());
}
 
?>

HTML Form

<form method="post" action="#">
  <input type="text" id="user" name="username" value="" placeholder="Enter your Username">
  <span id="response"></span>
</form>

JQuery Function

<script type="text/javascript">
$(document).ready(function() {
    $('#user').keyup(function() {
        var user = $(this).val();
        $.ajax({
            url: 'check_user.php',
            type: 'POST',
            data: {username:user},
            beforeSend: function(){
                $('#response').text('Wait.Checking Availablity');
            },
            success: function(response){
                $('#response').html(response);
                //alert(response);
              
    if(response == 'Not Available')
    {
  
        $("#user").removeClass("green");
         $("#user").addClass("red");
        msgbox.html(response);
    }
    else
    {
        $("#user").removeClass("red");
        $("#user").addClass("green");
        msgbox.html('<img src="available.png" align="absmiddle">');
    }
 

            }
        });
    });
});
</script>
Please share your comments and feedback.Thanks.

Tuesday, May 13, 2014

Twitter Like Follow And Unfollow With Jquery

In this article i am going to show how to create twitter like follow and unfollow buttons.


Lets take a look.


JQuery Function

      <script>$(document).ready(function(){
  $('.following_button').hover(function(){
      $(this).text("Unfollow");
    },function(){
       $(this).text("Following");
    });
      $('.following_button').click(function(){
    $(this).toggleClass('following_button follow_button').unbind("hover");
    if($(this).is('.follow_button')){
          $(this).text("Follow");
    }
    else{
          $(this).bind({
            mouseleave:function(){$(this).text("Following");},
            mouseenter:function(){$(this).text("Unfollow");}    
        });
    }
  });
});</script>

Html

<div class="container">
      <div class="content">
        <div class="acc"> <a href="https://twitter.com/vinothkumar23"> <img class="pic" src="images/smallred.png" /> <strong class="acc_name">Vinothkumar</strong> <span class="twitter_username ">@vinothkumar23</span> </a> <span class="refbutton following_button">Following</span> </div>
        <div class="acc"> <a href="https://twitter.com/vinothkumar23"> <img class="pic" src="images/small.png" /> <strong class="acc_name">Google</strong> <span class="twitter_username">@google</span> </a> <span class="refbutton following_button">Following</span> </div>
        <div class="acc"> <a href="https://twitter.com/vinothkumar23"> <img class="pic" src="images/smallred.png" /> <strong class="acc_name">Twitter</strong> <span class="twitter_username ">@twitter</span> </a> <span class="refbutton following_button">Following</span> </div>
      </div>
    </div>

Styles

.follow_button
{
color: #333;
background-color: whiteSmoke;
background-image: -webkit-gradient(linear, 0 0, 0 100%, from(white), to(#E6E6E6));
background-image: -webkit-linear-gradient(top, white, #E6E6E6);
background-image: -o-linear-gradient(top, white, #E6E6E6);
background-image: linear-gradient(to bottom, white, #E6E6E6);
background-image: -moz-linear-gradient(top, white, #E6E6E6);
background-repeat: repeat-x;
border: 1px solid #BBB;
border-color: rgba(0, 0, 0, 0.1) rgba(0, 0, 0, 0.1) rgba(0, 0, 0, 0.25);
border-color: #E6E6E6 #E6E6E6 #BFBFBF;
border-bottom-color: #A2A2A2;
-webkit-border-radius: 4px;
-moz-border-radius: 4px;
border-radius: 4px;
filter: progid:dximagetransform.microsoft.gradient(startColorstr='#ffffffff', endColorstr='#ffe6e6e6', GradientType=0);
filter: progid:dximagetransform.microsoft.gradient(enabled=false);
-webkit-box-shadow: inset 0 1px 0 rgba(255, 255, 255, 0.2), 0 1px 2px rgba(0, 0, 0, 0.05);
-moz-box-shadow: inset 0 1px 0 rgba(255, 255, 255, 0.2), 0 1px 2px rgba(0, 0, 0, 0.05);
box-shadow: inset 0 1px 0 rgba(255, 255, 255, 0.2), 0 1px 2px rgba(0, 0, 0, 0.05);
}
.following_button{
background-color: #49AFCD;
background-image: -webkit-gradient(linear, 0 0, 0 100%, from(#5BC0DE), to(#2F96B4));
background-image: -webkit-linear-gradient(top, #5BC0DE, #2F96B4);
background-image: -o-linear-gradient(top, #5BC0DE, #2F96B4);
background-image: linear-gradient(to bottom, #5BC0DE, #2F96B4);
background-image: -moz-linear-gradient(top, #5BC0DE, #2F96B4);
background-repeat: repeat-x;
border-color: #2F96B4 #2F96B4 #1F6377;
border-color: rgba(0, 0, 0, 0.1) rgba(0, 0, 0, 0.1) rgba(0, 0, 0, 0.25);
filter: progid:dximagetransform.microsoft.gradient(startColorstr='#ff5bc0de', endColorstr='#ff2f96b4', GradientType=0);
filter: progid:dximagetransform.microsoft.gradient(enabled=false);
}
.following_button:hover{
text-shadow: 0 -1px 0 rgba(0, 0, 0, 0.25);
background-color: #BD362F;
background-image: -webkit-gradient(linear, 0 0, 0 100%, from(#EE5F5B), to(#BD362F));
background-image: -webkit-linear-gradient(top, #EE5F5B, #BD362F);
background-image: -o-linear-gradient(top, #EE5F5B, #BD362F);
background-image: linear-gradient(to bottom, #EE5F5B, #BD362F);
background-image: -moz-linear-gradient(top, #EE5F5B, #BD362F);
background-repeat: repeat-x;
border-color: #BD362F #BD362F #802420;
border-color: rgba(0, 0, 0, 0.1) rgba(0, 0, 0, 0.1) rgba(0, 0, 0, 0.25);
filter: progid:dximagetransform.microsoft.gradient(startColorstr='#ffee5f5b', endColorstr='#ffbd362f', GradientType=0);
filter: progid:dximagetransform.microsoft.gradient(enabled=false);
}   
Please share your comments and feedback.Thanks.

Image rotate using CSS3

Image rotate using CSS3


Lets take a look.

Css Codes

<style>
        .img
        {
            width: 200px;
            height: 200px;
            margin: 100px;
            box-shadow: 0px 0px 10px 10px #000;
            background-color:#00CCFF;
            -webkit-transition: width 8s, height 8s, background-color 8s, -webkit-transform 8s;
            -moz-transition: width 8s, height 8s, background-color 8s, -moz-transform 8s;
            -op-transition: width 8s, height 8s, background-color 8s, -op-transform 8s;
        }
        .img:hover
        {
            -webkit-transform: rotate(5000deg);
            -moz-transform: rotate(5000deg);
            -op-transform: rotate(5000deg);
            background-color:#FF6600;
            cursor:pointer;
        }
    </style>

HTML Codes

<div class="img"></div>
Please share your comments and feedback.Thanks.

Monday, May 12, 2014

Snow Effect Using CSS3

In this post i am going to show how to create snow effect using CSS3.I have used three types of images for snow effects and used for in body tag.


Lets take a look.


Css Codes

      <style type="text/css">
body{
background: #000;
background-image: url('images/s1.png'), url('images/s2.png'), url('images/s3.png');
height: 100%;
left: 0;
position: absolute;
top: 0;
width: 100%;
-webkit-animation: snow 10s linear infinite;
-moz-animation: snow 10s linear infinite;
-ms-animation: snow 10s linear infinite;
animation: snow 10s linear infinite;
}
@keyframes snow {
  0% {background-position: 0px 0px, 0px 0px, 0px 0px;}
  50% {background-position: 500px 500px, 100px 200px, -100px 150px;}
  100% {background-position: 500px 1000px, 200px 400px, -100px 300px;}
}
@-moz-keyframes snow {
  0% {background-position: 0px 0px, 0px 0px, 0px 0px;}
  50% {background-position: 500px 500px, 100px 200px, -100px 150px;}
  100% {background-position: 400px 1000px, 200px 400px, 100px 300px;}
}
@-webkit-keyframes snow {
  0% {background-position: 0px 0px, 0px 0px, 0px 0px;}
  50% {background-position: 500px 500px, 100px 200px, -100px 150px;}
  100% {background-position: 500px 1000px, 200px 400px, -100px 300px;}
}
@-ms-keyframes snow {
  0% {background-position: 0px 0px, 0px 0px, 0px 0px;}
  50% {background-position: 500px 500px, 100px 200px, -100px 150px;}
  100% {background-position: 500px 1000px, 200px 400px, -100px 300px;}
}
</style>
Please share your comments and feedback.Thanks.